in

Déjà Dup: a Simple Backup Solution for Linux

- - 1 comment
Déjà Dup is a simple, easy to use GNOME-based backup solution for Linux. Despite its simplicity, the software comes with some fine features such as encryption, off-site backup, and more. It is also bundled with several key functionalities such as integration with Amazon's EC2 and its capability to setup an automated backup to a remote Linux server using protocols such as SSH. Let's take a closer look at some of the features that Déjà Dup has to offer.


Installation:

If you are using Ubuntu Linux, the installation process is quite simple. You need to add a repository, refresh the sources, and begin the installation using apt-get.

Add the repository:

# sudo add-apt-repository ppa:deja-dup-team/ppa
Open the sources.list file...
# sudo gedit /etc/apt/sources.list
then add the following entries at the bottom of the document:

deb http://ppa.launchpad.net/deja-dup-team/ppa/ubuntu karmic main
deb-src http://ppa.launchpad.net/deja-dup-team/ppa/ubuntu karmic main
Now refresh your apt sources:

# sudo apt-get update
And then complete the installation with the following command:

# sudo apt-get install deja-dup
Although the repositories that you add will differ between versions of Ubuntu Linux, the process remains the same. Voila, your installation should now be complete.

If you are using a different flavor of Linux, you might need to look up the documentation related to it to see how you can get the latest version of Déjà Dup installed on your computer.


Launch Déjà Dup:

Once your installation is complete you can launch Déjà Dup from the Applications menu. It should usually be located under the Applications -> Accessories in your menu. Upon first launch, you will immediately notice a simple, clean user interface with just two buttons on it - Restore and Backup. This is something that I particularly like about this backup tool. As a user, having limited options in the main window make mistakes less likely.


The Setup:

If you click on Edit -> Preferences, you will be able to set up things such as your remote server or EC2 account. This will launch a wizard that guide you through the necessary steps as you go about setting up your backup procedure. Other than a local backup, the tool offers you a number of other backup options such as Amazon EC2, FTP, Windows shares, WebDAV, and SSH.

This range of options is very useful. Also, the simplicity with which it has been implemented and presented makes it easy to use for novice users. During this setup you can define which parts of your system you want backed up, which backup system you want to use, whether or not you want to use encryption, and more.


Bringing It All Back:

An important part of the backup tool Déjà Dup is the restore feature, which allows you to bring back data from your backups. This process is relatively simple. However, I have yet to come across a backup solution for Linux that allows users to restore backed up data with the ease of Time Machine on the Mac. One big drawback is that you can only restore entire backups, and not choose a certain portion of your backup that you want to revert to. I hope that the developers of this tool will introduce some more advanced features in the restore process, as they have in the backup process.


Verdict:

Overall, I think that Déjà Dup makes for a great backup solution for Linux. With a straightforward installation process, a very well designed user interface, which makes the software usable even for non-computer savvy Linux user, a host of well thought out backup storage options, and good security in the way of encryption, this software gets two thumbs up from me. The one issue is that the restore process needs much work. I hope that the developers of this fine tool will put in some more effort into it, which could help make Déjà Dup become the most popular backup solution for Linux.

You may also check out: Get Lucky with luckyBackup

Keep Reading
in

Ubuntu 11.04 'Natty Narwhal': To Upgrade or Not to Upgrade?

- - 15 comments
It's been just a few hours since the release of Ubuntu 11.04 'Natty Narwhal', and the buzz about it just won't die down. Even though it brings along a slew of new features and changes, the reactions have been somewhat mixed. There are a lot of users who'll switch to Natty, but there are some who absolutely won't. Here are some reasons why upgrading to Ubuntu 11.04 is a good idea, and sometimes, a bad one too.


6 Reasons To Upgrade to Ubuntu 11.04:

1. Finally something shinier

For those tired with the plain and simple look of GNOME, Unity comes as a welcome change. The shell-based interface leverages the power of Compiz window manager to provide glossy menus and transparencies. The transparency of the top panel can also be tweaked, making the desktop look even more polished.

2. A Power User's dream

GNOME, which was more of a point, click-and-access type, was never that good with keyboard shortcuts. Moreover, it was lacking all the essential elements that should be there in a Power User's repertoire: files and applications searching, keyboard shortcuts, quick access lists etc. Unity however, comes with everything a Desktop ninja can dream of – keyboard shortcuts, searching, zeitgeist integration, quick lists and much more. This ensures a more productive and organized workflow not only for power users, but also for absolute neophytes.

3. Time for something fresh

It's been a long time since the Linux desktop received an overhaul of such proportions. While there are a few users who complain about the changes, there are many people who are excited about Unity and its new approach. In general, people are happy to see something fresh and new as far as the traditional Linux desktop is concerned.

4. Zeitgeist and Search

Windows 7 has it, Mac OS X has it and now Ubuntu will have it too. We are talking about Files and Applications search. It is one of those features that has been long overdue. Besides providing basic applications search, Unity's search functionality integrates tightly with Zeitgeist framework. This ensures that the recently used and the frequently used applications are much easier to find. If you know how to use it to your advantage, this feature will definitely provide a huge spike in your productivity.

5. New applications

Banshee, Libreoffice and Firefox 4, the lineup is enough to convince a Maverick/Lucid user to go looking for an upgrade button. Oracle's debacle called Open Office will now be replaced by its fork Libreoffice, giving FOSS enthusiasts another reason to smile. On the other hand, Banshee will steal the throne off Rhythmbox's head and will become the default Music player for Ubuntu. It brings along a lot of never before seen features that the Linux head-bangers were waiting for. And finally, don't forget the world's most popular open-source browser – Firefox. Firefox will be there in its latest incarnation – Firefox 4, which comes with a huge amount of new features, upgrades, and UI changes.

6. New Kernel

In November 2010, the Linux kernel received a small patch that radically boosts its performance across desktops and workstations. This patch has been incorporated in Linux kernel version 2.6.38, which will be a part of Natty. Thus, users upgrading from previous versions can expect a great deal of improvements in their overall performance.


5 Reasons NOT to Upgrade to Ubuntu 11.04:

1. My graphics card driver sucks!

Graphics cards are one of the biggest hurdles a user faces when migrating to Linux. Though open-source drivers are available for NVIDIA and ATI cards, they aren't as snappy as their closed source counterparts. Furthermore, the closed-source drivers aren't that perfect either; many of the drivers face a lot of bugs that don't get fixed for ages. Due to this, there's a huge chunk of users who aren't able to reap full benefits of their graphics cards while playing some Linux 3D games and performing graphic-intensive functions. Furthermore, the performance of Linux desktop in the graphics department is always a notch lower than its Windows counterpart. This issue coupled with the bagful of shiny new effects that Natty brings along, will make the switching experience troublesome for many. However, Canonical has done a great thing by introducing an option to revert back to the Classic Ubuntu desktop. Having said that, people with poor graphics support (especially ATI users) will anyway complain that- If I can perfectly run Aero effects on Win7 why can't I get Unity 3D to work smoothly on the same computer?

To understand what the state of proprietary drivers on Linux is like, do take a look at this bug:

click on image to enlarge

2. I like to keep it simple, stupid

Some people adore simplicity, they love the traditional Ubuntu desktop that provides a no-frills environment to work in. However, Unity, which brings along a slew of shiny new effects, may not be able to impress these desktop simpletons. Luckily for these people, Ubuntu offers an option to revert back to the GNOME desktop. However, these users might consider migrating to Mint, since it offers the traditional GNOME desktop and a lot more features that Ubuntu doesn't.

3. If I want something shinier, I’ll switch to KDE 4

For a long time, Ubuntu has been perceived as the simplistic, no-fuss and easy-to-use desktop. KDE 4 on the other hand, has all the features a modern desktop must have – eye-candy, multiple desktops, polished applications, desktop widgets etc. A valid argument a seasoned Linux user will make is that- why should he switch to a relatively new Unity interface, when he can switch to a much more seasoned and polished KDE 4? Also, it takes a bit of time to get used to Unity, whereas KDE 4 desktop is a bit similar to Windows 7 in look and feel.

4. I’m a GNOME loyalist so bye bye Ubuntu

The GNOME foundation has had a huge number of contributors over the years. This list includes many Ubuntu users too, as GNOME was part of the Ubuntu desktop till Natty. When Canonical decided to part ways with GNOME project, some GNOME loyalists were not so happy with the decision. Also, GNOME 3 came out before Unity, giving users another reason not to wait for Ubuntu 11.04 and start using GNOME Shell instead.

5. Awww its so ugly!

When Ubuntu decided to go with Unity, the reactions were mixed. There's still a sizable amount of users who find the new interface, just plain ugly. There's nothing much to be done here as everyone's entitled to their own opinion. And, since it was such a big decision, it is obvious that some people would not approve of it. However, it remains to be seen whether these aesthetic fanatics will adopt Unity purely for its functionality.

P.S: The 'it's so ugly' comment can be found on many blogs, forums and videos which have discussed or promoted Unity.


Finally:

If you're one of the users who are raring to switch to Natty, then head over to www.ubuntu.com and download it now. No matter what kind of connection you're using, do make sure that you use torrents while downloading the files. This makes sure that the servers won't get overloaded if in case Ubuntu gets too popular -- like it did when Lady Gaga went gaga over it :-) .

For the lazy ones, the link to the torrent file of Natty 32-bit can be found HERE. However, if your connection is too slow, then you can also purchase the official Ubuntu CDs from the Canonical shop.

For those folks who aren't switching to Natty, they have a lot of options to choose from. They can either switch to GNOME 3, KDE 4 or stick with the classic GNOME desktop. Moving to GNOME 3 will be swift once Fedora 15 releases. If unsure, take a look at a deep review we've done before, comparing Fedora 15 and Ubuntu 11.04. Finally, if you want to switch to KDE4, just type in the command: sudo apt-get install kubuntu-desktop and a KDE option will show up in your GDM sessions list.


Join the fun!

Go to the comments section and tell us your own reasons for loving or hating Ubuntu 11.04. If you're not upgrading, also tell your excuses for doing so.

Keep Reading
in

Protect Your Linux Backups with Encryption

- - 1 comment
If you work with important data on your Linux servers or desktops it is very important that you take regular backups. We have covered some backup tools and solutions that will help you do that.

Assuming you have a backup strategy and implementation in place, another important thing you need to worry about is the safety of your backups themselves. Safety includes two important factors. The first is the storage device or devices on which you store them. The other is to make sure that even if someone gets hold of your backups he can't look at the data.

Let's look at how to secure your backups so that anyone snooping around your system or backups drives cannot steal your valuable information. This can be done using encryption. As an extra layer of security we will encrypt your backups using gpg (Gnu Privacy Guard). gpg is an open source encryption software which ships with almost all flavors of Linux and UNIX. It's quite simple to use and provides several useful options. Let's take a look at how you can use it to secure your backups.

Encrypt Your Files:

The simplest usage of gpg is when you want to encrypt a single file. It could be a text file, a music file, or even an archived zip or tar.gz file. You can use a command like this:

# gpg -c backup.zip
Enter passphrase:
Repeat passphrase:
You will then be asked to enter a passphrase, which is basically a password that you can use to unlock the encrypted file. Enter it twice. Note that this passphrase is case sensitive. Once you are done you will find a new file in the folder you are in. It will be called something like "backup.zip.gpg". This is the encrypted version of the file "backup.zip". Now you can delete the original file so that your data is safe. If you don't delete the original file it beats the purpose of encrypting the file in the first place.

NOTE: Make it a point to note down the password you use someplace safe. If you forget your passphrase there pretty much no way to recover your data. You don't want that to happen.

Decrypt Your Files:

When you want to recover your files you will need to summon gpg again. Get into the folder where you have placed your encrypted backup file "backup.zip.gpg". Execute the following command to decrypt it:

# gpg backup.zip.gpg
gpg backup.zip.gpg
gpg: CAST5 encrypted data
Enter passphrase:
At this point you will need to enter the passphrase that you set up during the encryption process. Once you enter it you will find the original file "backup.zip" appear in the same folder.

Using in a Script:

Sometimes you might want to use the encryption process in your scripts, for example in your backups script. The method I showed you only works when you manually enter the password. In such a case embed the following line into your script. One issue with this approach is that the script will contain a clear text version of your passphrase. Also, replace the "backup.zip" with the correct file name of the backup file or the relevant variable such as "$backupfile".

# echo | gpg –passphrase-fd 0 -c backup.zip
The other line you should add to your script is one that will delete the original backup file once it's done encrypting.

Possible Issues:

The encryption process requires a lot of calculation, and therefore uses up a lot of your CPU resources. There are times when you are encrypting a large file when you will find a spike in your CPU usage. If you are automating the encryption process during your nightly backups you should make sure that this resource is available on the machine you are running your encryption on. Otherwise you might land up with too much load, affecting other important processes.

Choosing File Names:

There are a few other options that you can use in gpg. For example, during the encryption process if you want to specify the filename of the encrypted file you can do so. Use the following example to do it:

# gpg -c -o backup.enc backup.zip
Similarly, you can specify the file name you want to have the decryption process write to, using the following command:

# gpg -o backup20042011.zip backup.enc


Written by: Sukrit Dhandhania, FOSS advocate and regular contributor for TechSource.

Keep Reading
in

Cool Kindle Easter Eggs To Discover

- - No comments
Easter Sunday is here, and unlike last time (see: Top 50 Software Easter Eggs of All Time) we won't be revealing any software-related Easter eggs. Instead, we'll be looking for Easter Eggs in Amazon's popular Kindle device. Even though last week we mentioned some excellent Kindle tips, Kindle has many more tricks up its sleeve. Here's a look at a few of them:


Activate Picture Viewer: Kindle does have a basic picture viewer, but it's not activated by default, here's how to make it work:

1 Create a folder titled "Pictures" in the root of Kindle drive or SD card. Kindle also checks for DCIM made by cameras.
2 Create another folder inside it and drop all the pictures there. The pictures saved in this sub folder will be read as a single book. Supported formats are jpg, png, gif.
3 In the Home screen press Alt-Z. A new "book" should appear. Open it to view your pictures.
4 In the local menu you can also toggle dithering, resize to fit and full screen mode.


Searching For 'Pi's Directly From Home Screen: Searching for the letter 'e' without quotes from the home screen shows the value of the mathematical constant E. The same works for pi.

- Typing in @time shows the current time on the screen.

- Adding @wiki before any search term performs a search in Wikipedia.

- Adding @web before a search term searches for the term on Google.


Kindle as a calculator: Another hidden functionality in Kindle is its use as a calculator. And it's not just a simple calculator; in fact, it can compute even trigonometric functions pretty accurately. To use the functionality, just type in the expression you want to evaluate and press enter, the answer will be displayed instantly. For example typing in sin(98) displayed the answer accurately up to 15 digits. Here's what else you can compute with it: Multiplication, division, square roots(sqrt), power functions (^), trigonometric functions (sin,cos,tan,atan). However, unless you are Chuck Norris, dividing by zero still yields infinity. The above functions work well on Kindle 3 and Kindle DX, they might not work on older models.


Minesweeper: We've already mentioned this tip in an earlier post. Nevertheless, here's the trick again: Pressing Alt-Shift-M in the home screen opens up the uber-popular game of Minesweeper. For those living under a rock for centuries, Minesweeper is a single-player game where in one has to clear an imaginary minefield without detonating a mine. The game has been around since the 1960s and is also included by default in many operating systems. Ubuntu also comes with its own version of the game titled Mines. Enough talk for now, here are the keyboard shortcuts for playing it.

Alt-Shift-M - Start Minesweeper

At the start, you'll be presented with an empty grid. Move around the grid using Kindle's five-way controller. Click an empty mine using the middle button, and if you're not that unlucky, numbers will show up on and around the opened cell. If at all you expose a mine, you lose the game, and in that case, you'll have to restart by pressing R. Minesweeper involves a lot of guesswork, so if you think a particular cell contains a mine, you can mark it by pressing M.


GoMoku: Also known as Five in a Row, GoMoku is an ancient strategy board game. It is more like a leet version of Tic Tac Toe. The winner of the game is the first player to get an unbroken row of five crosses or zeroes horizontally, vertically or diagonally. To play the game, first start Minesweeper by pressing Alt-Shift-M. Then, once the game starts press G to play GoMoku or Press N to start a new game. During the game, use the five-way key to navigate around the grid. Pressing the middle button marks the cell. You can press S to swap positions. To go back to Minesweeper press M and to go back to the main menu press the Home button. The game may look easy at first; however, Kindle is a pretty tough opponent here. So, Good luck!


Geolocation: Yes, you heard that right; Kindle does have geolocation facilities built in. There's no GPS, but it uses its wireless hardware to determine location, a la iPhone. To use the feature, just open the browser by going to Menu > Experimental and clicking on launch browser. Then, Press Alt-1to show your current location on Google Maps. Note that on newer models, Q key represents 1, W represents 2 and so on. The map can be zoomed in and out just like on the PC using Kindle's 5-way navigation button. Pressing Alt+2 together finds the nearest gas stations, and pressing Alt+3 looks for the nearby restaurants. Sounds cool, but why didn't Amazon tell us about it?


Sources: Thanks to Reversing Everything blog for most of these awesome tricks.


Written by: Abhishek, a regular TechSource contributor and a long-time FOSS advocate.

Keep Reading
in

How to Enable Unity Quicklists in Google Chrome and Firefox

- - 4 comments
A few weeks ago, we did an in-depth review of Ubuntu 11.04 when compared with Fedora 15. One of the interesting little features we missed was Quicklists in Unity. Quicklists allow users to access common menus, or perform common tasks within a program by right-clicking the launcher icon. The feature is very much similar to Jump Lists in Windows 7, which could be accessed by right-clicking the Windows task bar. Applications, like Browsers and Media Players use these Jump Lists to let the user access documents and tasks associated with the current application. Unity on the other hand being freshly baked from the oven, there aren't many applications that take advantage of the Quicklist features. Here's a quick tip that will let you enable Quicklists for both Google Chrome and Firefox.


Using Google Chrome and/or Chromium:

Google Chrome and Chromium don't support Quicklists by default; however, with a little tweaking the feature can be enabled to support incognito mode. Here's the whole process in 2 easy steps.

Step 1: Backup - Open the terminal (Ctrl+Alt+T) and type in the following code:

sudo cp /usr/share/applications/firefox.desktop /usr/share/applications/firefox.desktop.backup

Step 2: Then, type the following line in the terminal:

sudo gedit /usr/share/applications/google-chrome.desktop

Step 3: Now that the file is opened, paste the following code at the end of the file. When done, press Ctrl+S and close the window.

X-Ayatana-Desktop-Shortcuts=NewWindow;Incognito;

[NewWindow Shortcut Group]

Name=New Window

Exec=google-chrome

TargetEnvironment=Unity

[Incognito Shortcut Group]

Name=New Incognito Tab

Exec=google-chrome --incognito

TargetEnvironment=Unity


When finished, the right-click menu for Chrome will look like this:


Using Firefox:

Firefox 4 can also be tweaked to show various options in the Quicklists. These options allow users to open a new window, toggle the Private browsing mode, start the Profile Manager, and use the safe mode. The safe mode starts Firefox without any extensions or plugins. The profile manager can be used to access different profiles before starting the actual session.

Right-clicking on the Firefox launcher icon and selecting 'Profile Manager' will open a window like this:


Anyways, enough talk, here's how to get it in 4 easy steps:

Step 1: Backup the file..

sudo cp /usr/share/applications/firefox.desktop /usr/share/applications/firefox.desktop.backup

Step 2: Open the terminal and type in..

sudo gedit /usr/share/applications/firefox.desktop

Step 3: Apparently, Firefox already supports the New Window quick list item. So, find the code that begins with a line that looks like this:

X-Ayatana-Desktop-Shortcuts=NewWindow;

This line will be followed by some code. Now, delete the line and the lines below it.

Step 4: Add following code to the file, press Ctrl+S and exit.

X-Ayatana-Desktop-Shortcuts=NewWindow;PrivateToggle;ProfileMgr;Safe-Mode;

[NewWindow Shortcut Group]

Name=Open a New Window

Name[ast]=Abrir una ventana nueva

Name[bn]=Abrir una ventana nueva

Name[ca]=Obre una finestra nova

Name[da]=Åbn et nyt vindue

Name[de]=Ein neues Fenster öffnen

Name[es]=Abrir una ventana nueva

Name[fi]=Avaa uusi ikkuna

Name[fr]=Ouvrir une nouvelle fenêtre

Name[gl]=Abrir unha nova xanela

Name[he]=פתיחת חלון חדש

Name[hr]=Otvori novi prozor

Name[hu]=Új ablak nyitása

Name[it]=Apri una nuova finestra

Name[ja]=新しいウィンドウを開く

Name[ku]=Paceyeke nû veke

Name[lt]=Atverti naują langą

Name[nl]=Nieuw venster openen

Name[ro]=Deschide o fereastră nouă

Name[ru]=Открыть новое окно

Name[sv]=Öppna ett nytt fönster

Name[ug]=يېڭى كۆزنەك ئېچىش

Name[uk]=Відкрити нове вікно

Name[zh_CN]=新建窗口

Name[zh_TW]=開啟新視窗

Exec=firefox -new-window about:blank

TargetEnvironment=Unity

[Safe-Mode Shortcut Group]

Name=Safe-Mode

Exec=firefox -safe-mode

TargetEnvironment=Unity

[PrivateToggle Shortcut Group]

Name=Enable/Disabe Private Mode

Exec=firefox -private-toggle

TargetEnvironment=Unity

[ProfileMgr Shortcut Group]

Name=Start Profile Manager

Exec=firefox -ProfileManager

TargetEnvironment=Unity


Finally, if all goes well, the menu will look like this:


Menu doesn't show up:
If the menu doesn't show up, remove the launcher from the Unity bar by right-clicking and unchecking the option titled “Keep in Launcher”. Then search for the program and drag it to the Unity bar again. The Quicklist should be visible by now.

If something goes wrong, type the following commands. These commands will restore the original ‘.desktop’ files and delete the modified ones, taking things back to normal.

For Google Chrome:
sudo rm -rf /usr/share/applications/google-chrome.desktop
sudo mv /usr/share/applications/google-chrome.desktop.backup /usr/share/applications/google-chrome.desktop

For Firefox:
sudo rm -rf /usr/share/applications/firefox.desktop
sudo mv /usr/share/applications/firefox.desktop.backup /usr/share/applications/firefox.desktop

Keep Reading
in

Awesome Tricks Every Kindle User Should Know

- - No comments
Kindle is a portable e-book reader from Amazon.com that has gained huge popularity since its launch. The Linux-powered gadget allows reading files in most of the popular formats including PDF, if you're using the latest version. Though it utilizes Amazon's own DRM format for Amazon e-books, it is not as heavily walled as Apple's iPad. Hence, there are some pretty cool tricks that can help you get more out of your Kindle. Here are 3 such tricks:


Reading manga on Kindle:

Manga is the Japanese word for comics. It is used in the English-speaking world as a generic term for all comic books and graphic novels that were originally published in Japan. Though Amazon.com doesn't sell any mangas especially for the Kindle device, users have found a way to download and read them on Kindle. Mangle is one software that does that really well.

Mangle is a cross-platform open-source application that helps users read mangas on their Kindle device. The tiny application written in Python, allows users to convert and transfer the manga images to the reader using an USB cable. The mangas are read on the device with the help of Kindle's image viewer. Also, Kindle being black-and-white doesn't pose much of a problem as most of the mangas are already in black-and-white. However, if you have a colored manga, it will show up in black-and-white on the Kindle.

The software can be downloaded HERE.

A detailed tutorial on how to setup and use the software can be found HERE.


Read Documents and Online Articles on Kindle for free:

Though Kindle comes with a JavaScript-enabled web browser, it is not the most convenient device when it comes to full-fledged browsing. Besides, the clumsy keyboard makes typing a real drag. But hey, one can never complain about Kindle's browsing capabilities, as long as it does what it says on the tin – read eBooks. But, when it comes to reading documents, transferring them manually using an USB becomes very tedious. Moreover, documents in other formats don't always look as good as they should.

There's a neat solution for that problem. When you buy a new Kindle device, you are provided with a @kindle.com email address where you can send any documents you want to read on your kindle. Amazon then converts those articles into its DRM format (ouch!) and then transfers it wirelessly (3G or Wi-Fi) to the device. The whole process costs a little money, but if you have a Wi-Fi connection, the same can be done for free. Instead of mailing the documents to your @kindle.com address, mail them to @free.kindle.com, and the document will be converted free of cost. Only caveat of this process is that, the article won't be delivered over 3G; hence, having a Wi-Fi connection is a must. Also, Amazon doesn't convert files sent in PDF format.

But what about those really long articles on the web?

Enter Send To Kindle. Send to Kindle is a browser extension that pushes the current page you're reading to your Kindle device. The setup is simple and just pushing the button sends the article instantly. Send to Kindle works on Chrome, Firefox, IE and Safari. It is a great way to read web articles without any distractions.

Download the extension from HERE.

If you prefer some other service that does the same job, here are 2 nice alternatives:

Later on Kindle (Google Chrome Extension): https://chrome.google.com/webstore/detail/ncpgbjikhdoedlilphcppnglbipboglf

Send To Reader (Bookmarklet): http://sendtoreader.com/


Essential Kindle keyboard shortcuts:

Keyboard Shortcuts: A couple of years ago Reverse Everything blog hacked the Amazon Kindle and posted some nifty keyboard shortcuts for the same (see: http://igorsk.blogspot.com/2007/12/hacking-kindle-part-3-root-shell-and.html).

Here are some of the best ones:

Alt-Shift-R: Reboot Kindle (press all buttons together for every combo henceforth)
Alt-Shift-. : Restart GUI

Some useful keyboard shortcuts while using the reader:

Alt-B: toggle bookmark
Alt-PageForward/PageBackward: go to next/prev annotation or one "chunk" (1/20th of a book) forward or backward

Hidden Trick: Playing Minesweeper!! (Yes, you heard right)

Alt-Shift-M (press together): Start Minesweeper

Here are the keyboard shortcuts to playing the game:

I,J,K,L: Up,left,down,right
M: Mark mine
R: Restart
Space: Open cell
Scroll: move cursor up/down
Alt-Scroll: move cursor left/right
H: return to Home screen


One great advantage the Kindle has over other eBook readers including the iPad is its $139 price tag. Moreover, being a Linux-powered device, you can tweak it to the max at the cost of your warranty of course. If you haven't bought it yet, here is a link to the product page. Also, if you know any Kindle tricks apart from the ones mentioned above, feel free to share them with us via comment.


Written by: Abhishek, a regular TechSource contributor and a long-time FOSS advocate.

Keep Reading
in

Top 5 Paid Games for Linux

- - 8 comments
With Linux matching Windows and Mac head-to-head in almost every field, indie developers are ensuring that gaming on Linux doesn't get left behind. We've covered various types of games that are available for Linux, from the best MMORPGs to the top action-packed First Person Shooters. While most of these games are free, there are a few paid games that have come out for Linux.

Here's a look at the top 5 paid games that are making noise:


Minecraft is a new cross-platform indie game, which has recently gained a lot of popularity. It is a 3D sandbox game, where players must try and survive in a randomly generated world. In order to do this, they must build tools, construct buildings/shelters and harvest resources. If you're still curious, then do check out the best minecraft structures created by addicted players from around the world. Minecraft comes in two variants – Beta and Classic, both with single-player and multiplayer options. The Classic version (both single-player and multiplayer) is free. On the other hand, Minecraft Beta, which is still under heavy development, will retail at 20 Euros (that's about 28.5 USD) when finished. For the moment, the game can be pre-purchased and played as a beta for 14.95 Euros. Users who buy the beta version won't have to pay anything for the stable release once it comes out.

In case you're still confused what the whole hype is about, then here's a nice video explaining the basics of the game:


This multiple award-winning game, developed by former EA employees has been one of the most popular games for the Linux platform. World of Goo is a physics-based puzzle game by 2D Boy, that works on Windows, Linux, Mac, Wii and even iOS. The game is about creating large structures using balls of goo. The main objective of the game is to get a requisite number of goo balls to a pipe representing the exit. In order to do so, the player must use the goo balls to construct bridges, towers, and other structures to overcome gravity and various terrain difficulties such as chasms, hills, spikes, or cliffs. The graphics, music, and the effects come together to provide a very Tim Burton-esque atmosphere to the game.

The game consists of 5 chapters, each consisting of multiple levels. In all, there are about 48 levels, making the experience truly worthwhile. In case you've missed it, World of Goo was part of the Humble Indie Bundle 1 and 2. However, the game can still be purchased at $19.95 from the Ubuntu Software Center or from the official website.


We've covered Amnesia in detail before. In this game, you play the role of Daniel, who awakens in a dark, godforsaken 19th century castle. Although he knows his name, he can hardly remember anything about his past. Daniel finds a letter, seemingly written by him and which tells him to kill someone. Now, Daniel must survive this spooky place using only his wits and skills (no knives, no guns!). Amnesia brings some amazing 3D effects along with spectacularly realistic settings making the game spookier than any Polanski movie. As of now, the game retails at as low as 10 USD. Before buying, you can also try out the demo version of the game HERE.

One warning though, don't play this game with the lights turned down; it's really that scary!


Vendetta Online is a science fiction MMORPG developed by Guild Software. Quoting the website “Vendetta Online is a 3D space combat MMORPG for Windows, Mac, Linux and Android. This MMO permits thousands of players to interact as the pilots of spaceships in a vast universe. Users may build their characters in any direction they desire, becoming rich captains of industry, military heroes, or outlaws. A fast-paced, realtime "twitch" style combat model gives intense action, coupled with the backdrop of RPG gameplay in a massive online galaxy. Three major player factions form a delicate balance of power, with several NPC sub-factions creating situations of economic struggle, political intrigue and conflict. The completely persistent universe and detailed storyline add to the depth of immersion, resulting in a unique online experience.”

The game has been around since 2004, and since then, it has evolved a lot with developers claiming it as one of the most frequently updated games in the industry. Gamespot rated Vendetta as 'good', but there have been some criticisms about its limited content compared to its high subscription price. The game uses a subscription-based business model and costs about $9.99 per month to play the game. Subscribers get a discount on subscriptions for longer blocks of time bringing the monthly price down to $6.67 a month. A trial (no credit-card required) is also available for download on the official website.


Osmos is a puzzle-based game developed by Canadian developer Hemisphere Games. The aim of the game is to propel yourself, a single-celled organism (Mote) into other smaller motes by absorbing them. In order to survive, the user's mote has to avoid colliding with larger motes. Motes can change course by expelling mass, which causes them to move away from the expelled mass (conservation of momentum). However, doing this also makes the mote shrink. In all there are 3 different zones of levels in Osmos, and the goal of each level is to absorb enough motes to become the largest mote on the level. With its calm, relaxing ambiance thanks to the award-winning soundtrack, Osmos creates a truly unique gaming experience.

The game has received a great response so far. On Metacritic, it has a metascore of 80, based on 22 critics reviews. Apple selected Osmos as the iPad game of the year for 2010. Osmos retails at $10 for the PC, Mac and Windows versions. The game is available across Windows, Linux, Mac OS X and iOS.


Why pay?

In the free world of Linux and Open-source, many people argue that if everything is 'free', why should I pay for a game? Of course, the Linux world is free but free doesn't mean free as in 'free beer', the word free implies freedom. Most of the popular games for Windows, now come with SecuROM and other such DRM restrictions that restrict one's fair-use rights. This means that the user will only be able to use the software on one machine, sometimes requiring constant activations.

Games and other software developed in the FOSS world don't have such absurd restrictions. Users are free to use and distribute the game, and yes there's none of that activation or cd-key nonsense. While these games respect the user's freedom, keeping them free (as in free beer) is not a viable option because developers have to devote a lot of time and money in making these games. So, shelling out a few dollars for these games will help the indie developers pay their rent as well as come up with many new games for this emerging gaming platform.

Keep Reading
in

10 Great Movies Worth Watching on YouTube

- - 2 comments
YouTube, a simple video-sharing site that began in 2005 has now become a global phenomenon. Be it 'David after Dentist' or 'The YouTube Symphony Orchestra', this Google-owned site, has found a way to keep everyone entertained. A while ago, YouTube started uploading full-length movies to a brand new section called YouTube Movies. While many of the movies there are too corny to watch, there are some that cannot be missed. Here's a list of 10 such movies.

N.B: The movies mentioned below are legally available through YouTube because they are available in public domain. Watching these movies will not violate any copyright policy whatsoever.


1. To Kill A Mockingbird
Based on the Pulitzer-winning book by Harper Lee, To Kill A Mockingbird is a story about Atticus Finch, a lawyer in the Depression-era South, who defends a black man from a false accusation and racial prejudice. Those who have read the book will agree that this novel is the finest American literature has ever produced. Also, the movie is perhaps one of the best screen adaptations of a novel. To Kill A Mockingbird currently ranks 34th in AFI's list of top 100 movies of all time. The movie stars the legendary Gregory Peck as Atticus Finch, in a role, which won him the Academy Award for Best Actor. The movie received 2 more Oscars, one for Best Art Direction and another for Best Adapted Screenplay. Furthermore, critics and audiences have deemed this classic as the best courtroom drama of all time. In case you haven't seen the movie yet, go find some time and watch the movie for it is a riveting journey from start to finish.


2. And Then There Were None
Based on the classic novel by mystery author Agatha Christie that was later adapted as the Broadway hit Ten Little Indians, And Then There Were None begins with ten characters, each with a skeleton in his or her closet, on a remote island off the English coast. They soon realize that they have been brought there by an insane judge, who has tried each of them for criminal behavior in the past, and who now feels it is his duty to render proper justice for each. The struggle to stay alive begins as each "guest" is eliminated in a fashion that corresponds to the titular nursery rhyme. Any mystery, suspense or thriller fan will be incomplete without seeing this work of absolute genius. This may be the best mystery ever put to film.


3. The Adventures of Sherlock Holmes
If you're expecting the Robert Downey Jr. one, you'll be let down, but if you're expecting a great Sherlock Holmes movie you'll never be disappointed. Rated 7.7/10 on IMDB, this 1939 classic stars Basil Rathbone as Sherlock Holmes and Nigel Bruce as Dr. Watson.


4. Oliver Twist
This movie, based on the classic Charles Dickens novel is the story of an orphan boy Oliver who runs away from a workhouse and meets a pickpocket on the streets of London. Oliver is taken in by the pickpocket and he joins a household of young boys who are trained to steal for their master. Star Wars fanatics won't miss the enigmatic Obi-Wan Kenobi, sometimes known as Sir Alec Guinness who plays the role of the wicked Fagin. This classic holds a 7.9/10 rating on IMDB. Watch it!


5. Fists Of Fury
The film that made Bruce Lee a phenomenon in Asia, Fists of Fury (also known as Big Boss) is about a young man (Lee) who works with his cousins in an ice factory. When his cousins begin to disappear mysteriously, he finds out that the factory is a front for a drug smuggling ring led by the Big Boss, Hsiao Mi a.k.a the evil bad guy. Now, I won't tell you how he gets back at the bad guys, because that's where the real action lies. A real treat for Bruce Lee fans, Fists of Fury is Rated R and is an English-dubbed version of the Mandarin and Cantonese original.


6. Cul-de-Sac
A wounded criminal and his dying partner take refuge at a beachfront castle. The owners of the castle, a meek Englishman and his willful French wife, are initially the unwilling hosts to the criminals. Quickly, however, the relationships between the criminal, the wife and the Englishman begin to shift in humorous and bizarre fashion. Described by Polanski himself as his best film, this 1966 BAFTA-nominated classic scores a decent 7.2/10 on IMDB. Another must-watch film for all Polanski fans.


7. Charade
Cary Grant and Audrey Hepburn are Oscar-nominated film stars. Need I say more?


8. Bringing Up Baby
A 1938 romantic comedy starring Cary Grant and Katharine Hepburn; again, needs no further explaining.


9. Gol Maal
Perhaps one of the funniest yet simplest Indian films ever made, Gol Maal still scores 8.2/10 on IMDB. A must see for all die-hard comedy fans.

P.S: The Youtube version of this film is in Hindi without any subtitles.


10. HOME
This 2008 documentary film produced by Luc Besson and narrated by Glenn Close, shows how the Earth's problems are all interlinked. To depict that, director Yann Arthus-Bertrand uses aerial images of 54 countries, and 120 locations shot over 217 days. Scoring an 8.4/10 on IMDB, this stunning documentary has already received over 15 million views on YouTube. Don't miss it at any cost!

Link: http://youtu.be/jqxENMKaeCU


Other great full-length movies, concerts and shows on YouTube:

Bob Dylan – 1966 world tour: The Home Movies: http://youtu.be/XdALCXGshu0

Muhammad Ali - The Greates: http://youtu.be/cPnlc8d5SCs

Popeye (for the CN nostalgics!): http://youtu.be/74hYhy7ickk

Rowan Atkinson Live (Full-length standup): http://youtu.be/uw8dW9Hyno0


This article was written by Abhishek, a TechSource contributor and longtime FOSS enthusiast/advocate.

Keep Reading
in

Best Free and Open Source System Cloning Solutions for Linux

- - 8 comments
If you have worked as a system administrator at an enterprise, you might be familiar with Norton or Symantec Ghost, a great network-enabled system cloning solution. It allows you to create an image of a computer's hard drive and store it to a location on your network. If the computer in question has a failure you can restore it from the image and be back in business pretty quickly and easily. Although this may not always be a solution that small organizations use often, it is quite popular with larger ones.

Symantec Ghost is a commercial software and comes with a pretty hefty price tag. However, there are several free alternatives for it in the open source world. Let's take a look at a few of my favorite ones.


Partition Image

Partition Image supports most Linux and Windows file systems. It also has some useful features such as support for the compression of the snapshots using gzip and other common archiving formats, and allows you to split the snapshot into separate files to burn onto DVDs and CDs. It has support for the network. So you can configure a remote location on your network where Partition Image should copy the snapshot file or files. However, the thing that I found most appealing about Partition Image is that it is pretty smart. Most cloning software take a block level snapshot of your system. With Partition Image, however, if it finds an unused block it skips it. Thereby saving you a lot of space on your image.

Another useful feature is that you can take snapshots of individual partitions as opposed to just the entire system. As an advanced Linux user this is great. You can take an image of the important partitions containing important system folders such as /etc, /var, and /home. This is particularly useful if you are planning to make some major changes to your server. For example, if you are planning on upgrading the Linux kernel on a server you can take a backup of the partitions that will be affected by the upgrade. If something goes wrong you can quickly revert those partitions from your backup.

Another application for Partition Image is when you want to install several computers quickly. Install and configure one computer. Take a snapshot of it using Partition Image. Then you can create multiple clones of that computer using the image file. The only catch here is that all computers must have the similar hardware configuration.


Partition Image, or Partimage, is available for download HERE. You can also get it using popular Linux distributions such as Ubuntu Linux using the application installer such as apt-get. It's very simple to setup and use and is highly recommended to power users who want an easy to use solution.


PING

PING, or "Partimage is not Ghost", takes a slightly different approach to Partition Image to the cloning process. PING comes in the form of a Live Linux CD. You can boot it using a CD, USB, or over the network. It has the standard set of features that you want in a cloning solution such as networking, the ability to write to Microsoft Windows shares, along with support for NFS, SSHS, and more. It also supports a great number of file systems and hardware. The fact that this is a bootable Live distro means that the creators of the project have bundled in a few cool features. For example, you can burn a CD or DVD of the image you create right from the distribution itself. You can also take a snapshot, format the drive, and restore the system right there and then. Another useful feature that PING has is the ability to back up the BIOS settings along with the system.

PING can be downloaded HERE. Download it and burn it on a disc and you should be in business.


Clonezilla

Clonezilla is perhaps one of the most popular open source alternatives to Symantec Ghost. It comes in two editions - Clonezilla Live and Clonezilla Server Edition. The first is made for single system cloning, for backing up and restoring, while the second one is made for a bigger setup and for cloning multiple systems and simultaneous cloning of systems. Clonezilla is based on the DRBL technology, which means that it is so efficient that it can simultaneously clone multiple systems in a matter of minutes. In short, it's very efficient.

The cloning process used in either edition of Clonezilla isn't that much greater than the other two options presented. It has the standard set of features such as support for many filesystems, support for dumping the image over the network, and image compression. The real advantage of Clonezilla is in the Server Edition. It is a robust, fast, and efficient cloning system. It is a perfect solution for enterprises that want to setup several systems with pretty much the click of a button.

A few offshoots of the Clonezilla project have come up in recent times. For example, GParted-Clonezilla LiveCD is a live CD that boots off GRUB and gives you the ability to execute either GParted or Clonezilla. This makes it really useful when partitioning requirements also need to be done. That's what Gparted does. Another one is Clonezilla-SysRescCD, which is a multi-boot backup/restore and rescue CD that bundles Clonezilla Live Edition and System Rescue CD. The latter utility is a collection of system rescue and recovery tools.

Clonezilla is also included in our list of free and open-source backup software for Linux.


Conclusion

I have presented three fine open source alternatives to Symantec Ghost. Each one of these is very good at what they do. Depending upon your requirements, you can always choose the one that you find useful. Don’t forget to let us know via comment what your experience was.

Keep Reading
in

5 Lesser Known Google Services that Deserve More Attention

- - No comments
Over the years, Google has evolved from the quintessential search engine into an all-comprising web powerhouse, bringing in the newest web technologies. Though the front line Google services like GMail, Reader and Docs have received huge popularity, there are some services that haven't yet got the attention they deserve. Here's a look at 5 such services from the big G.


Google Fast Flip:

Google Fast Flip is a service that lets users browse news, blogs and popular topics in a print magazine format. As the name suggests, flipping through content is very fast, so that users can browse through multiple articles until they find something they like. Fast Flip aggregates content from many top newspapers and magazines providing a seamless browsing experience. Apart from browsing various articles, users can also search for their favorite topics to get relevant articles. The user interface is very simple – the content covers 70% of the screen space. On the right, there is an ad unit and a neat share button, which allows sharing on Twitter, Facebook, Digg, Google Reader and Delicious. There is also a 'like' button that helps Fast Flip become more personalized. Google has partnered with publishers like the New York Times, The Atlantic, Washington Post and dozens more who share the revenue they earn from contextually relevant ads with Google. Fast Flip also has a mobile version that can be accessed at (http://fastflip.googlelabs.com/mobile) and it comes with tactile page flipping. The mobile version works well across most of the Android land iPhone devices.


Google Insights for search:

Google Insights is an interesting tool for comparing search volume patterns across specific regions, categories, time frames and properties. It helps in comparing search interests for products, movies,sports and almost anything that people search using Google. The user enters two or more search terms, which are each represented by different colors. The search volume data for those terms is then presented in the form of a neat graph; the Y-axis representing the search volume in percentage, and the X-axis representing the years from 2004 to 2011. A rising line indicates that the popularity of that particular term has risen over time. Besides the graph format, Insights shows a small map depicting regional interest for the term. The map is useful for gathering various types of statistics be it country-wise or city-wise. For example, did you know that Cubans and Russians search the term 'linux' and 'Ubuntu' more than Americans do? More such insightful data can be analyzed using Google Insights, which can be helpful for students, researchers or entrepreneurs. Here's an example search insight comparing the popularity of 3 Over-the-counter (OTC) drugs – Aspirin, Ibuprofen and Paracetamol.


Google Panoramio:

This is a great service that was acquired by Google in 2007. Panoramio is a community-powered site for exploring places through photography. It allows users explore cities, monuments, natural wonders and almost everything picturesque. However, the site should not be confused with services like Flickr and Picasa that allow users to post all types of photos. This site exclusively showcases all the cool places including famous ones like Eiffel Tower and Taj Mahal, and the not-so-famous-yet-beautiful ones like Elafonisi in Greece (http://www.panoramio.com/map/#lt=35.271376&ln=23.533058&z=2&k=2) and Hatsheput temple in Luxor (http://www.panoramio.com/map/#lt=25.738333&ln=32.607778&z=1&k=1). These photos can also be accessed as a layer in Google Earth and Google Maps. Registration is free and anyone can submit the pictures they take, provided it doesn't include too many people in them. A mobile version of the site is available for iPhones and Windows 7 phones (third-party).


Google Patent Search:

As the name suggests, this service lets users search for patents on different topics. Particularly useful for research, Google Patent Search also allows users to explore and download patents from a variety of fields including Technology, Medicine, Physics, Chemistry and more. Users can read and download the patents in PDF format. Non-technical users might not find this particularly useful; however, exploring interesting patents like pacifier, Monopoly, and golf club is a great way to know more about simple devices we now take for granted.


Aardvark:

Aardvark is a social search service that helps people get their questions answered by connecting them to their friends or friends-of-friends via live chat. The user posts his or her question, and then Aardvark finds the perfect person to answer the question in the user's social network. Questions can be submitted via email or instant messaging. The Mechanical Zoo, a San Fransisco-based startup, originally owned aardvark before being acquired by Google for $50 million in 2010. The service appears very much similar to Quora; however, Aardvark, unlike Quora, works bests for subjective questions for which human judgment or recommendation is required. For example, questions like 'Which is the best Star Wars movie?' is a typical question you might come across on Aardvark. Response to asked questions come fairly quick depending on the amount of users online in the asker's social network.


Here's a list of few more of such obscure services from Google:

Google Knol: Google's answer to Wikipedia.

Google Boutiques: A personalized shopping experience that lets users find and discover fashion goods.

Google Squared: Extracts structured data from across the web and presents its results in spreadsheet-like format.

Google Fusion Tables: A tool for gathering and visualizing arbitrary data.
me

Google Indic Music search: Allows users to search and listen to thousands of Hindi songs.

Keep Reading
in

Setting Up SugarCRM on Shared Web Hosting

- - No comments
If you want to setup a CRM solution for yourself or your organization and don't have a dedicated server for it, you can use a shared web hosting solution. There are plenty of options available, some are cheap and others a bit more expensive.

I have been a fan of Dreamhost's web hosting solution. I'll guide you to setting up SugarCRM on a web hosting account. The instructions should not be too different for other hosting companies. However, I'll assume that you have access to a database, and SSH access to the file system. Some hosting companies do not allow you SSH access to your account, and only FTP access. Although you can still perform most steps, it is a bit more complicated.


Prerequisites:

SugarCRM is a LAMP application. So it requires a database server, preferably MySQL, and a web server with PHP 5 or better, preferably Apache. Sugar will work on Windows, Linux, Mac, and with Oracle or MSSQL instead of MySQL. However, for this tutorial I will assume that you are using Linux, Apache, MySQL and PHP.


Create Database:

The first step you need to perform is to create a database for your SugarCRM installation. Log into the control panel of your shared hosting account do this. Many hosting companies use CPanel for this purpose. If so, go to the Customer's Area and then over to the section for MySQL databases. Now, pick a good name so you can recognize the database. I will use a name like sugarcrmdb01. The problem with shared hosting is that you have to pick a unique name, and something simple like SugarCRM might have already been taken.


Get SugarCRM:

There are two versions of SugarCRM. There's a paid version and a community edition. The community edition is free and open source CRM software. That's the version we will be using here. So head over to the project's website (at http://www.sugarcrm.com/crm/download/sugar-suite.html) and download the latest release of the community release. The last release at the moment of writing this is Sugar Community Edition 6.2.0beta3. Download it and copy it to your shared hosting. If you have SSH access to your host, you can download the SugarCRM installer directly onto the server using the wget downloader.


Setup Domain:

If you plan to buy a domain name for this setup or already have one, you can use it. If not, you can do what I did, which used a subdomain such as sugar.mydomain.com. Uncompress the Sugar CRM files into the root folder of the domain's document root. Make sure the files contained inside the Sugar-CE-XXX folder are in the root directory, and not the folder itself.


Begin Setup:

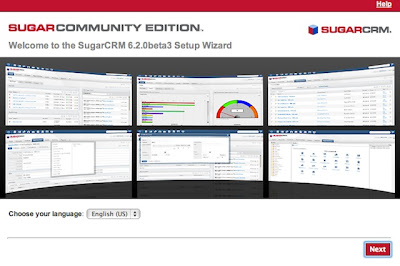
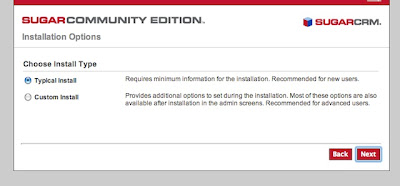
Once all of the above has been done, the fun begins. Launch your web browser and go to sugar.mydomain.com, or whatever domain or subdomain you picked for your SugarCRM setup. You will then be welcomed by the Installation Wizard. Pick the language you want to use and hit the Next button. You will see a list of prerequisites and then you need to accept an agreement. After this, the installer will proceed to check your setup for compatibility. In the next step you need to pick whether you want the standard installation or a custom one. I'll go with the Typical Install. Next comes the database. SugarCRM will automatically detect and display any options that may be there.


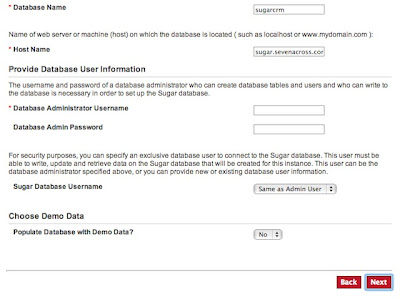
Now you need to enter the details of your database setup. Enter the name of the database you created, along with the domain of the database server and the username and password required to access it. Another useful option to enable is the one that asks you if you want SugarCRM to populate the database with some demo data. This is a good option to use if you are new to using it. Hit ‘Next’ when done.


The last step you need to perform is to choose a username and password combination for the admin user of your SugarCRM setup. Pick these carefully if you plan to use it for a team. Once you are done, hit ‘Next’. You will get a summary of the installation. Voila, you have almost reached the end of the installation process now. Hit ‘Install’ to complete the installation.

If you want you can register your installation with the Sugar CRM team. If not, skip it by hitting ‘Next’.


Written by: Sukrit Dhandhania, FOSS advocate and regular contributor for TechSource.

Keep Reading