×

Label: for dummy

How to Doodle and Sketch on Your Android Smartphone

As smartphone sizes are increasing, there's a lot more you can do with them rather than just sending texts or playing games. With screens of size 5 inches or more, phablets like the Galaxy Note 4 and the Google Nexus 6 make it possible for you to even write or doodle on your device. This is very useful for taking down quick notes and sketching important diagrams in a business meet. While not everyone owns a Note device, there are many apps that let you make the most out of your touchscreen and use it for sketching or doodling. What's more, if you have kids, you can hand them your smartphone and let them create their own masterpiece. Either way, with these apps, you have a fantastic drawing tool at your disposal.


Sketchbook Express


If you are a professional artist, Sketchbook is a must-have app for you. Developed by Autodesk, this free app provides a set of dedicated sketching tools for devices with screen sizes 7" or smaller. Whether you prefer to capture your ideas on a paper napkin or draw beautiful sketches of people that you see everyday, this application lets you take your creativity to a level that you want. Though the app is for professionals, it can be used by pretty much anyone who has a flair for drawing and sketching.


Evernote Skitch

While not strictly a sketching or a doodling app, it is a useful addition to the list, nonetheless. Evernote's Skitch lets you annotate images and even PDF files so that you can be more expressive with the data you already have. It's a great tool to snap a picture of something, mark it up with your own ideas, and then send it to someone who can help transform the idea to reality. It is definitely worth a try for the creative types.


Doodle Magic

Doodle Magic is an app that kids will love. It is simple, without any extra bells and whistles, and just works. You get to draw on a black background with bright glowing colors, which might seem a bit odd at first, but results in some great artwork if you are good at it.


Doodle Text

If you are someone who likes to have more fun with your photos, Doodle Text is an app for you. Once installed, you'll be able to doodle on your photos, add some funky effects, and then send the picture to your friends. This means that you can draw a moustache, make yourself look like a ninja, or even type in messages for your loved ones. As far as sharing features go, this app has plenty with even an ability to post to your Facebook wall. Go ahead; share your masterpieces with your buddies!


Bamboo Paper

Bamboo Paper is an app with a simple goal: Turn your Android smartphone into paper. Among the apps mentioned in this list, this one is probably the most accurate and the most useful one. With precise inking tools, annotation capabilities, and much more, Bamboo Paper really strikes out as a doodling app that you can actually use in your daily life. Once installed, you can create your own notebooks wherein you can sketch, write, or doodle anything you want. Once you are done, you can share those notebooks with colleagues and friends via Dropbox, Evernote, Twitter, and Tumblr.


Infinite Painter

Infinite Painter is an app specially designed for Galaxy Note smartphones that come with S-pen or similar styluses. Once installed, there is a lot you can do with this app. Aimed for creative minds, this app is perfect if you are someone who paints a lot or likes sketching. Instead of frantically searching for a canvas every time you head out, you can have a full-fledged virtual canvas at your disposal. Though using the app on smaller (5 inch or less) devices won't do it much justice, it is still a good investment if you are serious about sketching.


Continue reading →

How to Write Screenplays Using Your Android Device

If you are a budding screenwriter who's always on the move, writing a screenplay on your Android smartphone is the last thing you'd think of. In fact, there are barely any apps that fulfill the promise of a full-fledged writing experience on your mobile device. Having said that, hope's not lost. Android users who love to travel and love to write will find some of the screenwriting apps that we are about to share with you quite handy.

Most of the following Android apps work very well on Android smartphones. However, one must generally avoid writing full-fledged scripts using the phone’s small screen. What these apps work great for is editing bits and pieces of your script without you having to wait till you get home from work and open your computer. In short, these apps, though few, work quite well, but cannot be relied upon too much so investing in quality desktop screenwriting tools is still highly recommended.


FadeIn Mobile

FadeIn is a fabulous screenwriting application that works across all major platforms including Windows, Linux, and Mac. The mobile version of the software is designed to complement the desktop counterpart. This means that you'll be able to edit .fadein files on your smartphone without any difficulties. What's appealing about this app is that you don't have to worry much about formatting as it's automatically taken care of. Also, if you are someone who worries a lot about losing your files, FadeIn hooks quite nicely with your Dropbox account thus allowing you to safely backup your script. The only and perhaps the biggest drawback of this app is that it doesn't work with .FDX files or any other major file formats in the industry. 


Celtx Script


Celtx is a well-known free application that lets you write screenplays across multiple platforms. Its desktop counterpart retains most of the features that let you write scripts in screenplay, AV, stage play, audio play, and comic formats. To use the app, you'll need to sign up with a free Celtx account. This means that your scripts will be safely backed up and synced to the cloud without needing any external account. Though the app doesn't come with many fancy features, it is still useful for quickly typing out things on the go.


DubScript Screenplay Writer

DubScript undoubtedly has to be one of the most feature-rich applications on the list. The app works with four of the major script formats: Fountain 1.x, Final Draft (.fdx), Trelby, and CeltX (.html). And yes, this is the only app that provides you a suitable environment for creating a screenplay from scratch and then exporting it. What makes DubScript so special is that it uses the Fountain markup. This means that you won't have to waste unnecessary time focusing on the format of your screenplay. Just write and the app will handle the formatting part for you. Once you are done writing the script, it is neatly formatted by the app and can be exported as .fdx or even an .html file. If you want to print it directly, you can use Android's printing functionality to do that. The app can also export files into PDF format. You can then send those files to anyone one else by exporting the file via email, Evernote, or even Twitter if you are a little courageous.


MyScreenplays

MyScreenplays is another great app for writing screenplays on your smartphone or tablet. What makes this app stand apart is that it provides a unique non-linear approach to screenwriting. In other words, you can pick out any part of your script and start editing it whenever you want to. Most of the formatting happens automatically without you having to worry about it. MyScreenplays acts like a non-linear video editor but for screenplays. As for the supported file formats, the app can both import and export files in .fdx format. If you want, you can also export in HTML, Doc, PDF, and Celtx. Apart from extensive support for various popular formats, MyScreenplays also comes with some great editing options.


Continue reading →

How To Sync Files Quickly Between Your Own Computers (Using BTSync)

For many, syncing files between two computers on the same network is a nightmare. You have to connect the computers by doing some network tweaking and then copy each file individually. Oh, and then there is a lot of waiting involved. Another big problem that many users face is that let's say you've transferred 90% of the files and by mistake you shutdown the computer or turn off the router, most of your progress will be lost. And if you are someone who has Mac, Linux, and Windows desktops in the same house, good luck.

But wait… Isn't there Dropbox, which already solves the problem of syncing files? Well, it does, but most of your data belongs in the cloud. Transferring 400 GB worth of movies from your laptop to desktop won't be something Dropbox would do easily. The following tutorial will help you sync your files across multiple computers on the same network using a fabulous lesser-known app called BTSync.


Step 1: Install BTSync

Download and install BTSync on your desktop. It doesn't matter whether you are on Windows, Linux, or Mac. The software works across all platforms. 


Step 2: Generate a secret

Select a folder you want to sync. A good way of doing this is creating a folder titled "Sync" and then dropping all the files you want to sync as you go. And then, when the app asks you to generate a secret key, do so by entering a fairly hard to guess phrase. When the secret key is generated, remember it (hard to do) or write it down in a safe place. Don't worry if you can't do that right now, you can always access the secret from the main computer where the app was first installed. 


Step 3: Add more files to sync

Now in the sync folder, add as many files as you want. Instead of dropping multiple folders to the syncing application, you can simply keep adding more files to that folder using Nautilus, Finder, or Explorer. This saves you the trouble of having to remember multiple secrets. 


Step 4: Add another computer

To add the second computer you want to transfer the files to, simply install the app again on that computer. Then, during setup, just let the app know that you already have a secret key. Here, type in the secret key from the first computer and soon your files will start transferring seamlessly. 


Accessing files from Phone (Optional): If you have an Android smartphone, you can even access your BT Sync files from there. Simply download the app from the Google Play Store and then right click on the Sync folder from the main app. Select the option that says Connect Mobile. Then, a barcode will pop up letting you instantly pair your smartphone with your desktop. This means that once you are connected, you can even access your whole music collection on your desktop right from your phone. Cool, isn't it? 


Written by: Abhishek, a regular TechSource contributor and a long-time FOSS advocate.

Continue reading →

How to Use Parental Controls on Ubuntu Linux

The Internet serves as a vast reserve of knowledge and information. From the latest news to funny videos of cats playing pianos, pretty much everything can be found on the World Wide Web. However, the dangers of the Internet are rarely talked about openly.

The Internet is a wide-open jungle that pretty much everyone can explore in any way possible. Without restrictions of any kind, the freedom offered here is a complete opposite of the constrained lives we live on a daily basis. This freedom though, in the wrong hands could be very dangerous. Kids often accidentally stumble upon violence, pornography, and other things that are inappropriate for their age. This is where the need for parental controls comes in. 

Parental control ensures that kids can browse the web with complete freedom but without stumbling upon any of the bad stuff. In this article, we will outline some simple yet effective tools that will help you create a safer browsing environment for your kids.


Method 1: Using OpenDNS

This is the simplest and the fastest way to block any unwanted content reaching your web browser. OpenDNS, once configured for your router, will help you secure your network against most known adult-related sites. Simply set up OpenDNS using the instructions given HERE or contact your system administrator to help you set it up for you. Once it is up and running, simply set the filtering to ‘moderate’ from the accounts settings menu. This will block most adult websites. However, if you want to go a step further, you can set it to ‘high’ which basically blocks most of the sharing, social, and webmail services all of which may or may not be suitable for your kids. 


Method 2: Using the 'hosts' File 

A quick way to block particular site(s) on your Ubuntu desktops is by making changes to the 'hosts' file. 

Step 1: Open the terminal using the Ctrl+Alt+T combination or by looking for it in the Dash menu. Then take a quick backup of your hosts file by typing in the following command: sudo cp /etc/hosts /etc/hosts.old

Step 2: Now that we are on the safer side, let us edit the 'hosts' file by adding the sites we need to block.

Let's say you wanted to block yahoo.com. Open the file in the text editor: sudo gedit /etc/hosts

Once the ‘hosts’ file opens up, type the following to block Yahoo! from your computer: 

0.0.0.0 www.yahoo.com

Step 3: Press Ctrl+S to save and you are done. 

You can add as many sites to the list as you want. Remember not to make any changes to what's already there in the file. All you have to do is append your sites to the list. 


Method 3: Using Google Chrome

If you are a Chrome user you can install a simple extension called Blocksi that helps you block potentially harmful websites. The extension scans through 76 million rated web sites, and more than 20 billion rated Web pages to help you maintain safety as your kids use the web. 


Method 4: Using Timekpr

Timekpr is an application that won't help you block sites but will surely help you limit the amount of time the kids spend on the computer. With a neat access limit feature, Timekpr would automatically log the computer out when a particular time limit is crossed. Though not that stable, it is a great tool you can add to your repertoire if you want complete control over your computer. 

Continue reading →

How to Learn Python Quickly

Python is one of the most popular languages out there as far as programming is concerned. With development of this language starting in 1980s, it was awarded as the most popular programming language in 2013. Python is an open-source, object-oriented, multi-threaded programming language that has reached widespread adoption since its birth. Simplicity, one of Python's core philosophies, has made the open-source programming tongue quite popular amongst beginners.

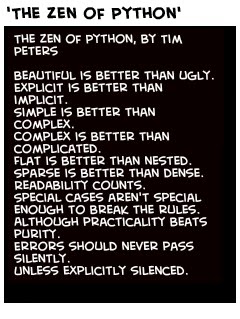
As compared to other languages, Python relies heavily on simplicity. Less is more, is one of the key aspects of Python. A great summation of the language's philosophy has been published by Tim Peters in a document titled "The Zen of Python." The following few lines from that document give you a taste of what Python is really about.


This simplicity is what makes Python very easy to learn. Not just non-programmers, even school kids can learn Python without any difficulty. Furthermore, for tech entrepreneurs who want to learn how to code but don't have enough time to do so, Python is a great place to start. If you too are looking for resources to help you learn Python quickly then read on as we discuss some of the best courses out there:


Real Python

If you are an entrepreneur looking to design an MVP or Minimum Viable Product, Real Python is the only course you need. Unlike any other course out there, Real Python teaches you only the things you need to start turning your ideas into reality. This means that instead of learning every bit and byte of the language itself, you'll be equipping yourself with only the necessary stuff you need to make a solid web application. Real Python comprises 3 courses: course 1 and course 2 teach you the basics of python and web development. Course 3 on the other hand teaches you advanced web development with Django 1.6. While the first two courses are available for download right away, the third one -- which was a part of a successful Kickstarter funding -- will be available in March.


Learn Python the Hard Way

Don't let the title of the course fool you. Learn Python the Hard Way is one of the best resources to learn Python quickly. The $30 course teaches you everything you need to learn to become a proficient Python programmer. What separates this course from other books on Python is that it focuses more on practice rather than theory. Each chapter makes you type out every line of code instead of spending hours reading about the language. In fact, each chapter in LPHW is an exercise in itself, thus helping you "do" rather than just read. There is no way to tell how much time it would take for you to complete this course because it depends on how much work you really put in. If you are not able to shell out $30 just yet, don't worry. There is a free version of the course out there that covers almost all of the syllabus.


CS101 at Udacity

Aimed at beginners, not only will you be learning programming in this course, you'll also be giving tests and doing homework like in a real classroom. Taught by David Evans who is a Professor of Computer Science at the University of Virginia, CS101 teaches you the key concepts of computer science so that you can skillfully apply them into building something cool. By the end of the course, you'll be equipped to write code in Python, and yes, build your own search engine. The syllabus comprises videos and exercises that help you learn better. One of the best parts about CS101 is that it takes approximately 6 weeks to learn, which is fairly quick considering what you'll be learning here. Also, by the end of the course you get a certificate of completion, which is another bonus point as far as your employment search goes.

Continue reading →

How to Turn Videos to Animated GIF Images Using Your Android Device

GIFs have become the latest craze. Introduced by CompuServe in 1987, GIFs serve as the perfect medium for expressing your emotions on the Internet. Whether you're shocked or annoyed by the person commenting above you, a moving image is the best way to convey what you feel. Sites like Reddit are flooded with funny animated GIFs that go from being hilarious to outright weird. On the other hand, sites such as Reaction Gifs allow you to pick GIFs for expressing your reaction in forums and on other sites.

If, however, you are more on the original side, you must have mulled over the idea of creating your own GIFs. While there are many apps and even websites that let you make such images, having your images transferred to your PC from your smartphone or tablet is a rather hectic task. Wouldn't it be cool if you could just shoot a video and then turn it into animated GIF?

Well, there's a way to do that. Thanks to some great applications, you can now turn any video you shoot into a funky-looking GIF. You can then share that image with your friends and have a good laugh.


Super Video Gif Maker:

Step 1: Install Super Video Gif Maker from the Play Store HERE.

Step 2: Choose your Movie

Basically, Super Video GIf Maker functions as a wonderful movie player. It can play movies in various formats. So, if you have shot a few videos, you can browse through them as much as you want. Once you have decided which movie to turn into a GIF, skip to the part that you want to convert.


Step 3: Create the GIF

While playing the video, click on the button on the right-hand side of the video to choose the part that you want to turn into an image. From here, you can individually select frames to include in your GIF. To select frames, all you have to do is press the button on the left. Once you are done, save the image. You can play the GIF as many times as you want to make sure that it turned out the way you wanted.

If you are having trouble using the aforementioned app, you can try using Android Video to GIF HERE.


A Great Alternative: Cinemagram


Cinemagram is more than just a animated GIF maker. If you are on the creative side of life, then this app will breathe a new life into your creativity. Basically, Cinemagram allows you to create a looping 4-minute video to which you can add various effects. 


One of the most distinct qualities about Cinemagram is that many parts of the image are still while a single portion of it is moving. This creates a really beautiful effect that tempts the viewer to keep watching the image over and over again.

Continue reading →

How to Turn your Android Device into a Dynamic Photo Frame

Photographs serve as our best memories. Through good times and some great times, photographs stay with us etching our emotions deftly onto a little piece of paper. Over the years, photographs have gone a major transformation. Few years ago, taking a photo meant that you had some memory that you thought would be worth sharing. You took a picture and then kept it with you for the rest of your life. These days, taking a picture is all about getting the maximum likes on Facebook or Instagram. Oh, and there's the bizarre trend of "selfies" that well, isn't that cool as you might think.

For those who take photographs for keeping their memories alive, however, Facebook isn't a big obsession. For them, photographs are worthy to be cherished and even showcased on objects like photo frame. However, you won't get your hands on photo frames everywhere, especially if you travel a lot. In that case, allow us to share with you some ways on turning your Android smartphone or tablet into a dynamic photo frame:


Dayframe

If you are looking for a photo frame application that just works, then Dayframe is all you need. It has all the features you're looking for and you probably won't be needing any other apps on the list. Dayframe, apart from being a photo frame is also a social-connected photo application. The way the application works is very simple. Instead of you having to select photos from your collection or worse upload them, Dayframe automatically pulls your pictures from your Facebook, Twitter, Tumblr, 500px, Dropbox, and Google Plus accounts.

Now, there are two ways to use Dayframe. Either you can use it to display your personal photos or you can use it to show beautiful pictures from some great photographers. 


If you choose to go with the first option, the app will ask you to mention the sources from which Dayframe should pull your pictures. For example Facebook, Twitter, Instagram etc. To avoid chaos, once you select multiple sources, you can set filters so that only the photos you want will be displayed. So, say you want photos of your last vacation to be displayed. All you have to do is set a keyword so that Dayframe pulls only the specific photos related to that tag.

The second way to go with using this application is to let the application pull photos from a wide variety of curated sources. The sources are curated according to your own taste thus making it a worthwhile experience. Finally, the best feature is that of the timer. The timer lets you display pictures only in a specific time slot. So, if you are not at home, don't worry, you can set Dayframe to work in a such a way that when you come back home, you'll have a set of beautiful pictures displayed in your living room.


Photo Slides

Photo Slides is another great app for turning your device into a dynamic photo frame. It pulls photos from your Gallery intelligently and displays your pictures as a nice slideshow. What's more interesting is that this app also supports G-sensor. This means that the photo frame will adjust itself according to the way you orient your smartphone or tablet. What's more, the application also comes with 8 different sliding effects thus letting you give your photo frames a slightly funky touch.


Android Daydream

Jelly Bean came with an often-overlooked feature called Daydream. Basically Daydream allows you to display a screensaver every time the phone is docked. What's great about Daydream is that it also lets you turn your phone into a nice-looking photo frame. Simply go to Settings then click on Display. From there, select Daydream. The feature allows you to set your own photos as a screensaver. In this way, you can turn your phone into a dynamic photo frame. The only caveat is that the phone needs to be docked or charging. That won't be a big issue with most people since they'd use the photo frame whilst docked so that they won't have to worry about battery drainage. The only caveat with this method is that your phone needs to have Jelly Bean installed.


Written by: Abhishek, a regular TechSource contributor and a long-time FOSS advocate.

Continue reading →

How to Install Netflix on Linux

It's 3 AM in the night. All the lights are off. The only light in the room is the one emanating from your laptop screen as you're trying hard to keep your eyes from shutting off. Then, for a moment you wince and gasp as Kevin Spacey looks at you and reveals his next Machiavellian plan. The episode ends and you admit to yourself, you're hooked to House of Cards.

Be it "House of Cards" or "Orange is the New Black", Netflix is known for keeping its users hooked to their service. In fact, Netflix has become the next HBO. Founded in 1997 by investing $2.5 million on one of the co-founder's own money, Netflix initially launched with 30 employees and 925 workers. The idea had come to Reed Hastings (CEO and co-founder of Netflix) one day when he was forced to pay $40 in overdue fines after returning Apollo 13, which was past its due date.

Soon, the popularity of Netflix grew making it a major player in the movie rental business. This maybe hard to believe but in 2000, Netflix was offered to Blockbuster for $50 million. Blockbuster declined and the rest is history. With a business model based on flat-fees and unlimited rentals without any due dates, shipping charges, or late fees, Netflix has become a household name for movie and TV lovers.

As omnipresent as Netflix is, it is not officially available on Linux yet. Thankfully, though, developers have come up with unofficial versions of the app. In this article, we'll show you ways to get Netflix working -- using these unofficial versions -- on your Ubuntu or Fedora desktop.


Ubuntu


On Ubuntu, installing Netflix is pretty simple. All you have to do is add the ppa and then install the app. First, open up your terminal by pressing Ctrl + Alt + T together and type in or paste the following commands:

sudo apt-add-repository ppa:ehoover/compholio
sudo apt-get update
sudo apt-get install netflix-desktop


To start Netflix, open the Dash using the Super key and type in Netflix to search for the app.


Fedora

Installing Netflix on Fedora isn't as straightforward as it is on Ubuntu. However, this doesn't mean that it is difficult. All you have to do is type in or paste a few commands and you are done.

First install wget by typing in the following command:

sudo yum -y install wget

To download Netflix in your home directory, type in:

wget -c http://sourceforge.net/projects/posti...

Then, unzip the file:

tar -xvzf Netflixplayer.tar.gz

Then, start Netflix Player using the following command:

sudo sh Netflixplayer.sh

To run Netflix every time, all you have to do is type in the following command in your terminal: 
 
sudo sh /usr/bin/Netflix.sh


Alternatively, if you want to save yourself some trouble and instead watch Netflix from your browser, Webupd8 has an excellent guide on how to enable Silverlight on Linux (which is required to run Netflix). You can check out the guide HERE.


Written by: Abhishek, a regular TechSource contributor and a long-time FOSS advocate.

Continue reading →

How to Get the Flat UI Look on Your Ubuntu Desktop

iOS is the latest Operating System to have jumped on the flat UI bandwagon. This trend, supposedly started by Microsoft with the Metro UI, is slowly overtaking the world. Be it Facebook, Twitter, or your desktop operating system, everyone's going flat. The days of shiny and skeuomorphic design are over and new minimalistic UI elements that involve less gradients and more contrast have arrived. What makes the "flat look" stand apart is the fact that it is minimalistic and goes really easy on the eyes. The elements of the interface that need the attention get the attention they deserve with the high contrast buttons.

Apple pulled off the revamp very well and so did Twitter by getting rid of "shiny objects" and sticking to minimalism. If you're a Linux user, you might have noticed that your Ubuntu setup doesn't really live up to the flat trends. While some elements of Nautilus have moved in that direction, it isn't really the "look" you're looking for. Thankfully, in the Linux world, there's an answer to your every prayer.

This quick and easy tutorial will show you how to give your Ubuntu desktop the flat UI look:


Step 1: Install the Numix Theme

Type in or paste the following commands to install the Numix PPA on your desktop. Open the terminal by pressing the combo Ctrl + Alt + T to enter these commands:

sudo add-apt-repository ppa:numix/ppa
sudo apt-get update
sudo apt-get install numix-gtk-theme numix-icon-theme-circle unity-tweak-tool


Step 2: Apply the Theme


The above command will install Numix theme along with the icon set on your desktop. It will also install Unity Tweak tool, which is required to apply the theme. Now that the installation is complete, open up Unity Tweak Tool by searching for it in the Dash.

Once the app opens, go to Appearance → Theme

Here, change the theme to Numix and save the settings.

Now in the same window go to the tab that says “Icons”. Change the icons to Numix Circle and save the settings. Et, voila! This completes the "flat look" you were looking for.


Step 3: Go One Step Further

Now that you've applied the theme, your desktop will completely conform to the "flat look". However, if you want to tweak it even further, feel free to add stuff from the following resources:

To get more of the Numix touch for your desktop add the scrollbars as a userstyle in Chrome. Furthermore, if you are a conky user, you can apply the following conky themes to match with your new look: 


Step 4: Get a New Wallpaper

Finally, to make things even more perfect, you can download wallpapers from sites like interfacelift.com and wallbase.cc to complete the look.


Written by: Abhishek, a regular TechSource contributor and a long-time FOSS advocate.

Continue reading →

How to Get NVIDIA Optimus Working on Ubuntu Linux

These days, most applications make use of your dedicated graphics card. Even running Ubuntu in its full glory requires you to have a decent graphics card. Oh and yeah, gaming is another area where you need to invest your hard-earned money into buying either an NVIDIA- or AMD- enabled laptop. The problem here is that graphic-intensive tasks, especially those that make full use of your graphics card consume a lot of your battery life. In fact, sometimes people feel that they'd be better off with a modest Intel graphics card.

Taking note of this problem, NVIDIA came up with an ingenious solution called NVIDIA Optimus. What Optimus does is that it dynamically switches between your onboard Intel graphics and your NVIDIA graphics card in order to save power. So, for example, when you're playing a game, Optimus will switch from Intel to NVIDIA so that you could have the best gaming experience. However, when you are working on that Excel Spreadsheet, Optimus makes sure that you are using your Intel graphics thus saving you a lot of power.

NVIDIA Optimus is already available on Windows with the default NVIDIA drivers set. On Linux, however, the Bumblebee project is responsible for bringing Optimus to your laptop. The following guide will help you get NVIDIA Optimus working on your Ubuntu desktop and hopefully make the most out of it. (This guide assumes that you have an Intel and an NVIDIA card on your laptop. For more information check the instruction manual accompanying your device).


Installing Bumblebee

Since the Bumblebee project is officially supported by Ubuntu, all you have to do is type in the following command in your terminal:

sudo apt-get install bumblebee bumblebee-nvidia

This will install the required drivers on your computer. Now, to run an application using NVIDIA drivers, all you have to do is type optirun before the app's name and enter it into the command line. Here's an example of how to run Firefox using Nvidia drivers:

optirun firefox 


Making the Most out of Bumblebee

To ensure that you can switch between your onboard graphics and your NVIDIA card anytime you want, all you need to do is install the Prime indicator applet for your desktop. Once installed, an indicator applet shows up that displays the graphics card that is currently in use. Upon clicking the icon, you can switch between the two cards. As simple as that.

To install Prime indicator on your Ubuntu computer, you'll have to add the Webupd8 ppa to your list of repositories. Enter the following commands to do that:

sudo add-apt-repository ppa:nilarimogard/webupd8
sudo apt-get update
sudo apt-get install prime-indicator


For all the perfectionists out there, you can download the Bumblebee configurator from a PPA. This tool allows you to configure Bumblebee to your liking and even troubleshoot it in case something doesn't go away. Type in or paste the following commands to install the tool:

sudo add-apt-repository ppa:alessandrofac93/bumblebee-config-gtk-dev
sudo apt-get update
sudo apt-get install bumblebee-config-gui


Written by: Abhishek, a regular TechSource contributor and a long-time FOSS advocate.

Continue reading →

How to Install Skype in Ubuntu 13.10 and Fix Common Issues

Skype is one of the best applications out there as far as communicating with people you love is concerned. Owned by Microsoft now, millions of people rely on Skype on staying in touch with their loved ones who are staying far away. The freemium Voice over IP service was first released in 2003. By the end of 2010, it had 663 million registered users. In 2011, the service hit a major milestone when it was acquired by Microsoft for a whopping $8.5 billion. While its presence on Windows and Mac has seen many updates, its Linux version had been largely ignored until recently.

Over the past couple of years, Skype on Linux has seen many updates, thus making it very stable and reliable software, at least as compared to its earlier iterations. Though not quite perfect, it has some rough edges that unfortunately affect many Ubuntu users who are new to the free operating system.

So, if you have installed Ubuntu (particularly Ubuntu 13.10 "Saucy Salamander") for the first time and are looking for ways to install Skype, simply follow this tutorial:


Installing Skype


To install Skype, first open the command line. You can do this by searching for "Terminal" without quotes in the dashboard or simply using the keyboard combination (Ctrl + Alt + T). Then, once the terminal is open, type in or paste the following commands in the given order:

sudo sh -c 'echo "deb http://archive.canonical.com/ saucy partner" >> /etc/apt/sources.list'

sudo apt-get update

sudo apt-get install skype


When you enter the first command, you'll be prompted to enter your root password. If you don't know the root password, contact the system administrator.


Fixing Sound Issues

Many users have complained of sound issues when using Skype on Ubuntu 13.10. A simple fix for this problem is found by entering the following command in your terminal (Ctrl + Alt + T)

sudo sed -i 's/^Exec=.*/Exec=env PULSE_LATENCY_MSEC=30 skype %U/' /usr/share/applications/skype.desktop


Fixing the Indicator Applet Problem

Many users find that the indicator applet doesn't show up after installing the software. This is especially annoying if you use Skype on a daily basis. A fix for the issue is a simple command that you can enter in your terminal.

Type in or paste the following command in your terminal to show the indicator applet.

sudo apt-get install sni-qt sni-qt:i386


Conclusion

The issues pertinent to Skype can easily be fixed by using the aforementioned commands. The main reason Skype runs into trouble after each upgrade is that it only supports LTS releases in Ubuntu. So, as the libraries get updated for the newer versions of Ubuntu, Skype starts conflicting with them. Let's hope that Microsoft starts paying more attention to its sworn enemy a little more now. To install Skype directly from Microsoft site, you may go HERE:


Written by: Abhishek, a regular TechSource contributor and a long-time FOSS advocate.

Continue reading →

How to Add Instagram-like Effects to Photos Using Your Linux Desktop

Instagram has become a new phenomenon lately. Be it a celebrity or your classmate, you'll find at least a dozen people you know snapping their own pics, applying retro effects to them, and sharing them all over the Internet. From Kim Kardashian to Pope Francis, the vintage snap revolution has taken the world by storm. Instagram, launched in October 2010, was first available solely through the Apple App store. As the company grew, it expanded its wings to our favorite platform that is Android. Then, it was acquired by Facebook for $1 billion thus leaving the founders laughing all the way to the bank.

One thing many Linux fanboys and fangirls don't know about is that Instagram actually runs on Ubuntu Linux 11.04 ("Natty Narwhal") thus further reinforcing the soaring popularity of the open-source desktop. That being said, your favorite photos don't have to be limited to one single platform for you to flaunt those cool retro effects. Many different applications and services have cropped up that let you add those same effects without the need of Instagram. The following are ways in which you can use the same features on your Linux desktop:


Xnretro

Xnretro is a cross-platform tool that lets you add retro effects to your photos. The app, which works on Android, Windows, Mac, and even Linux, has as many as 20 color effects. What makes this app even cooler is that it has light effects like bokeh thus allowing you to create beautiful pictures. Once installed, the usage of this app is pretty simple. All you have to do is add your photo and select from the different effects like retro, vignette, and frame. If you are a pro user, you can fine-tune the settings further by changing the various output settings.


Pixlr Express

Another great app that you might want to try is Pixlr Express. Though you won't find this app working as a native software, you will, instead, be surprised how good it is once you start using it. Not only does this app bring Instagram-like photo editing to your web browser, it also brings some of the best photography tools for you to use on any of your snaps. Like other web apps, Pixlr installs directly to your Google Chrome browser thus allowing you to add it to your desktop like any other normal app. Once installed, you'll be able to import your photos from your computer, from your webcam, or from a URL. These photos can then be fixed for redeye, vibrance, color, contrast, and blur. In the effects section, you can add various popular retro-style effects to your snaps thus making them look really cool. Once you're done, you can export those photos back to your computer so that you can access them from anywhere.


Written by: Abhishek, a regular TechSource contributor and a long-time FOSS advocate.

Continue reading →

Best Free Programming Courses on the Internet

Programming is a beautiful art. Well, though traditionally, one might call it a science, it's more of an art if you look at it in an objective perspective. Programming, like painting or music, once learned, lets you create new things. In fact, once you learn to code, you can even change people's lives by bringing them programs or apps that they need. In your own artistic way, by the sheer power of code, you can affect how people interact with their computers, smartphones, and other devices thus making programming a powerful tool in modern society.

Code is poetry, as you may have heard somewhere. Writing good code requires a solid understanding of the basic principles and much more. Like Malcolm Gladwell said in his book Outliers, it takes 10,000 hours of hard work to achieve something great. The same goes with code. You'll need a solid foundation on which you've based your coding practice. And, for that, you'll need to learn from the best of teachers.

Having said that, learning programming can be quite an ordeal, especially for newcomers. There are a plethora of resources on the Internet, but most of them cost a lot of money. So, how can an aspiring coder find resources, which are not only free but also provide the best instructions?

The answer to that question lies in this article. Below, we've listed some of the best resources we could find for you to get jump-started on coding. Despite the fact that these resources are free as in free beer, they've been rated as some of the best ways to learn programming.


Khan Academy

Khan Academy, a free learning resource, lauded by none other than Bill Gates, has been providing a great collection of programming material for newcomers and advanced students. The programming course provided by Khan Academy is more design-oriented thus aiding a lot of visual learners. Instead of relying on mathematical problems and algorithm, this course takes a unique approach to programming by helping you learn to draw different shapes and figures. Everything from basic coding to arrays is covered in this course and can thus be used as a comprehensive introduction to the world of coding.

 
Code Academy

Code Academy is one of the best places to get started with coding if you know absolutely nothing about programming. The site offers interactive tutorials that let you get started with coding without allowing you to make any excuses. From here, you can learn JavaScript, CSS, HTML, PHP, Python, Ruby, and even how to access APIs. Rather than providing just tutorials for you to peruse, Code Academy takes a unique approach by focusing on the community aspect that lets you join your friends in their coding endeavors. Overall, it is a great place to start with coding if you are from a non-science background.
 
 
Learn Code the Hard Way

Learn Code the Hard Way is a collection of e-books and free resources that let you learn code, well, the hard way. Now, as daunting as the name sounds, this course is actually for beginners. The hard way simply implies that the course focuses on learning by doing rather than just reading, which is in fact what coding is all about. Many people have found immense value from these courses, and since they are free (to access HTML version of the e-books), they can access them anytime they want.


Introduction to Programming (Udacity)

Udacity offers a wonderful course that introduces you to the world of programming. Without paying thousands of dollars for a University, you have a reputed professor like David Evans teaching you some of the core fundamentals of computer science. What separates this course from other resources in this list is that it teaches you the important basics of computer science. Though you won't get to learn as much coding as you would in other courses you'll learn some very important things that will help you create better programs. I'd suggest using this course in conjunction with other books.


Library of Freely Available E-Books on the Internet  

GitHub has a wonderful huge list of free e-books that let you learn almost any programming language. This collection houses books on every aspect of coding be it GUI, database, or structures. Keep the link bookmarked if you are planning to be a coder in the long term.


Conclusion: The aforementioned courses are, in my opinion, some of the best free resources to get you started with coding.

Continue reading →

How to Make Ubuntu's Dash Work Faster on Older Computers

Ubuntu 13.10 is the most polished and stable iteration of the open-source desktop. With lots of bug fixes and less of new features, Saucy Salamander set a solid foundation towards a convergent desktop that we'll get to see in 2014. Canonical with its many plans has ensured that Ubuntu users have something to boast about to their Windows and Mac loving friends.

Despite the fact that Ubuntu in its latest iteration is perfectly stable, people who use older computers often find themselves limited to using lighter desktop environments like XFCE. However, with little tweaks, they could switch to Ubuntu and make it perform faster on their old system.

If you are someone who is frustrated with the slow performance of Unity on your old computer, here are some tricks that will help you switch to a modern desktop without breaking your workflow:


Disable Blur

This is a well-known trick that will help you speed up Dash's performance in great measures. By disabling Blur, you won't be able to see the nice-looking effect that the Dash is well-known for; however, in return, you'll be able to enjoy a much faster desktop without losing on any feature.

To disable Blur effect, you'll have to install Unity Tweak Tool first. Unity Tweak Tool is a great software for making the most out of your Ubuntu desktop. It can let you change themes, customize your desktop appearance, and even lets you define hot corners for Unity, a feature badly missing in the OS. To install the tweak tool, open your terminal or press Ctrl+Alt+T anywhere on your desktop, and type in or paste

sudo apt-get install unity-tweak-tool


Once you install the tweak tool, open your Dash by pressing the Super or Windows key and search for Unity Tweak Tool.

Once opened click on the first link that says Launcher and navigate to the tab that says Search.

Here, you'll see an option that says Background Blur. Simply slide the button to off to disable the blur. Instantly upon disabling the effect, you'll find that the Dash becomes more responsive and becomes much quicker.


Disable Online Suggestions

In the same window, uncheck the options that say Search Online Sources and Show More Suggestions. This will force Dash to search only from local sources thus making it more faster and responsive.


Avoid Installing Any New Scopes

On the Internet, you'll find a lot of new scopes and dash plugins have popped up, which let you make the most out of your Unity desktop. However, as enticing as they seem, you need to understand that those plugins could heavily slow down your desktop's performance. The reason for this is that most of the plugins are still under heavy development and we're yet to see any good scopes or dash plugins released in the Software Center. If you have a slow computer, it is best to abstain from installing any new plugins that directly interfere with the functioning of the Dash.


Written by: Abhishek, a regular TechSource contributor and a long-time FOSS advocate.

Continue reading →

7 Things To Do After Installing Ubuntu 13.10 “Saucy Salamander”

The release of Ubuntu 13.10 “Saucy Salamander” didn't cause a lot of excitement among Ubuntuers. It was, nonetheless, a very important iteration to one of world's most popular operating systems. Not only did Saucy bring a lot of bugfixes to the Linux desktop, it also set a right foundation for building a solid convergent OS. Overall, this release brings the best of what Linux has to offer in a very solid and stable package. If you've just installed the update, you might be wondering what to do to get started. If so, don't worry, the following guide will help you get the most out of Ubuntu 13.10 “Saucy Salamander”.


1. Install restricted codecs

By default, Ubuntu doesn't come with the codecs you need to play your favorite music and videos. Thankfully, you can overcome that restriction by installing the following codecs. To install the restricted codecs, all you have to do is open your terminal (Ctrl + Alt + T) and then paste or type in the following commands:

sudo apt-get install ubuntu-restricted-extras


2. Try out the new scopes

Probably the most noteworthy feature in Ubuntu 13.10 is the addition of Smart Scopes. So, what are smart scopes really? Smart Scopes allow you to search for anything you want right from your desktop by intelligently gathering data from your computer as well as the web. This means that when you search for let's say Paris, the Dash will now query a variety of sources from the Internet and then will give you an intelligent response. So, typing Paris in your Dash will give you Wikipedia entries for Paris, and also the weather.

Similarly, if you are looking for a song that's on your computer, you can enter the artist's name and the albums list by that artist will show up in the Dash. By clicking a link, you can start playing the song. However, if you wanted to know more about a particular artist, you can scroll down the Dash to see the artist's Wikipedia entry. For example, typing Katy Perry gives you the song list as well as her Wikipedia information.

You can further tweak this feature by enabling or disabling specific sources. Let's say you are not that interested in learning about the weather, you can simply disable the weather results by turning off the Weather Channel filter. The best way to make the most out of this feature is to try it out a few times till you get a hang of it. If you are a Reddit user, though, you are in for a treat as the Dash can now let you search the site across all subreddits.


3. Enable Additional Drivers

Go to Dash and search for 'Software & Updates' without quotes. Then, in the Software and Updates window, click on the tab that says Additional Drivers. The software will search the right drivers for your device thus allowing you to make the most out of your desktop.


4. Get your gaming gloves on

Install the Steam application from the Ubuntu Software Center and start playing some of the best games out there. Gone are the days when you had to reboot into Windows to play your favorite games.


5. Install VLC

Let's face it. VLC is the most versatile media player out there. Throw anything at it and it will play that stuff without any glitches. Whether you want to play the latest HD movie or listen to your favorite song recorded in some cryptic format, VLC is your go-to media app.

sudo apt-get install vlc


6. Make Unity Yours

Tweak Unity to the max by installing either Ubuntu Tweak or Unity Tweak tool. Both applications give you the ability to make Ubuntu behave your way. Be it getting rid of minor quirks or trying on the latest themes like Faenza, tweaking tools are best suited not just for power users but for new users as well.

sudo apt-get install unity-tweak-tool


7. Install Communication Apps

Though one might tend to get lost in the awesomeness of Linux, it is important to stay in touch with our loved ones and friends. That's why no installation is complete without a set of cool communication apps such as Skype and Viber. 

To install and run Viber, type in the following commands in the terminal:

wget http://download.cdn.viber.com/cdn/desktop/Linux/Viber.zip
unzip Viber.zip
cd Viber
~/Viber/Viber.sh


Written by: Abhishek, a regular TechSource contributor and a long-time FOSS advocate.

Continue reading →

How to turn your Android Smartphone into a Wireless Headset for your Linux Desktop

There are many ways of watching movies on your Linux desktop. Like Windows and Mac, Linux also provides a plethora options for movie buffs to watch their favorite movies in any way they want to. For the ones who like freedom, there's VLC, which can play any file you ask it to. Also, it comes with many advanced features that will help you enjoy the movie no matter which format it is encoded in.

For folks who prefer everything built-in, there is the default media player which is not only more minimalistic and clean when compared to Windows Media Player or iTunes, it is also capable of playing many proprietary formats (when codecs are installed). For hardcore movie buffs, Linux also provides XBMC, a full-blown media center equipped with solid library-management features. Thus, there's no doubt that no matter how Linux users want to enjoy their movies, they always get their money's worth, or rather freedom's worth.

But some of us seek comfort to the maximum level. We want to lie down on our couch, grab a bucket of popcorn, and want to watch the movie at maximum volume. Well, feels like heaven, doesn't it? Well, unfortunately, if you have neighbors or hardworking roommates, that dream often stays unrealized. Turning up the volume, even slightly might get us in trouble with the neighbors or fight with the roommate.

So, is there any solution to this dilemma? Will I ever be able to watch Avengers while listening to every single sound effect in the movie?

The answer is yes.

You can either buy wireless headphones from your local electronic shop or you can use your Android smartphone as a wireless headset. Yep, you heard that right -Android smartphone as a wireless headset.

SoundWire is a fantastic application that lets you send any music or audio from your computer to your Android phone. Be it Grooveshark on your web browser or movies on your VLC player, the app can help you send any sound to your smartphone. Thus, by installing the app, you can plug in your headphones to your phone and enjoy the movie from your couch.


Once you download the app on your phone, all you have to do is install the server on your desktop that you can download from HERE. The free version of the app lets you enjoy 45 minutes of remote audio play from your computer on your smartphone. This means you can test the app for quite a while before buying it.

Another good advantage of the app is that it works across all platforms. So, if you use iTunes on your Windows machine, you can use this app there as well.

Once installed, you might have to fiddle with the settings of the app for a while.


Written by: Abhishek, a regular TechSource contributor and a long-time FOSS advocate

Continue reading →